How to Install Gorilla Build on Kodi
Today we are going to show you how to install gorilla build on Kodi. Gorilla is an amazing Kodi add-on where you can steam your favorite content.
Also, this add-on is very famine with all kinds of devices mainly for android or Firestick. The pin features of this add-on are Sports, TV shows, music, or whatever you want.
If you want to feel this add-on feature you just need to install on your device. The installation process is quite easy and simple.
So let’s dive into the article.
How to Install Gorilla Build on Kodi
From the main screen tap on the Settings icon.

Choice the File Manager.

Choice Add-source.

A new window comes up just press on None.

Write the correct URL https://fiercegorilla.com/kodi/ and tap OK.

Name the file Gorilla.

Back to the main menu and press on add-ons.

Choice package installer image.

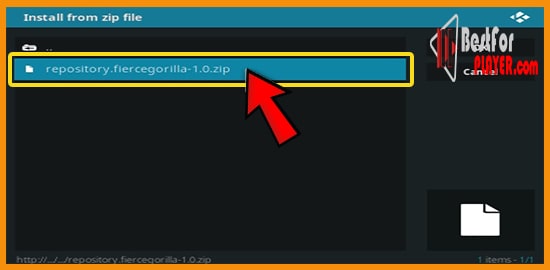
Tap on install from Zip File.

Choice the file named Gorilla.

Tap on repository.fiercgorilla-1.0 zip.
Wait until the installation finish notification comes up.

Tap on Install from repository.

Choice Gorilla repo.

Then go for video add-ons.
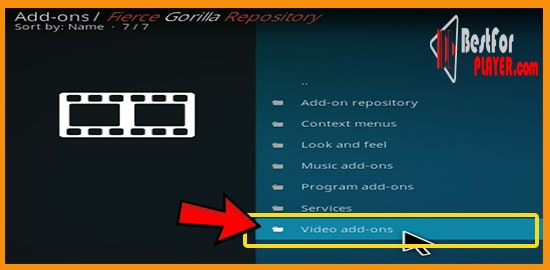
Choice Fierce Gorilla.

Tap on the Install button.

That’s it! Now you can enjoy the feature of this add-on. If you face any problem then feel free to tell us in the comment box.

I am Bernard Damian, Founder of bestforplayer.com. I am a professional content writer, freelancer. I am a computer expert and have written articles for technology, computer and software magazines as well as websites like Techradar or PC Magazines. If you have any questions, comments, suggestions. feel free to contact us.