How to Install Phoenix on Kodi 17.3
This tutorial will show you how to install Phoenix on Kodi 17.3? This adds effort for all Kodi versions like Kodi 17.1, Firestick, and Kodi android.
In 2016 Phoenix Kodi closed in numerous countries, so this addon is not occupied. But this technique will aid you in installing Kodi Phoenix.
This is the newest way to install this addon. So let’s start to explore the method.
Contents
Phoenix Repo Kodi
Old repositories are sometimes abandoned or expired in the world of Kodi Addons. New repositories take their place. Sometimes, you may have to wait for a new working repository to replace an old or broken one.
Here you’ll always find the most up-to-date working repositories to support Phoenix addon. These repositories are regularly checked and updated by us.
Kodi Phoenix Repo Name: Kodi Phoenix Reborn Repository
Kodi Phoenix Repo URL: http://phoenixrebornbuild.com.hr/phoenixrepo/
Related article: Install Genesis Reborn on Kodi 17.6
How to Install Phoenix on Kodi 17.3
Open your Kodi media player and tap on the Setting gear icon.

Then tap on File Manager.

Tap on Add Sources.

Then press on <None>.
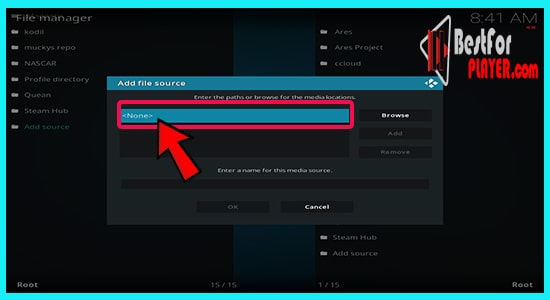
Write the following URL http://phoenixrebornbuild.com.hr/phoenixrepo/ and tap on OK.

Name it like Tutorials.

Return to the main screen and tap on Add-ons.
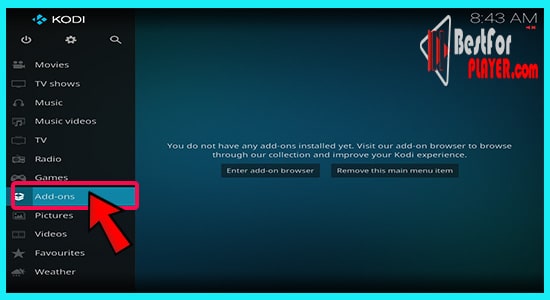
Then tap on the package installer icon.

Tap Install from Zip File.

Choice Tutorial from the slant. Then go for repos > repository.xbmchub-1.0.6 zip.

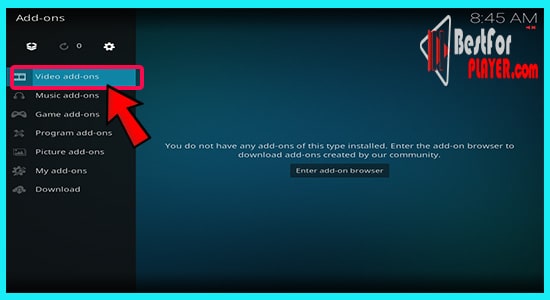
Tap Install from Repository.

Tap TVadd-on.ag add-on repo. The next tap on Video Add-ons.
Tap on Phoenix and finally tap on Install Button.
Extra Tips:
How to update Phoenix on Kodi
- Install Phoenix from the official Kodi repository
- Open Phoenix and go to Add-ons > My addons
- Select Video add-ons > Phoenix
- Go to Live TV > Channels, select a channel, then click on the right arrow icon in the top left corner of your screen.
- You can also press “c” on your keyboard or hold down the C key on your remote control for a list of channels currently airing live television content.
- Change channels by clicking on different numbers at the top of your screen or scrolling through with the arrow keys.
How to fix Phoenix on Kodi
- Install Kodi on your device
- Open the app and go to settings
- Click “addons” in the left-hand menu
- Select “Install from zip file.“
- Find the zip file you downloaded earlier, click it, then press “yes.”
- Please wait for a few seconds while it installs Kodi on your device.
Conclusion
I hope this guide helps you to install Phoenix on your Kodi. If you have any questions, please tell us in the comment box.

I am Bernard Damian, Founder of bestforplayer.com. I am a professional content writer, freelancer. I am a computer expert and have written articles for technology, computer and software magazines as well as websites like Techradar or PC Magazines. If you have any questions, comments, suggestions. feel free to contact us.

How to Install Asgard Addon on Kodi in 2022

How to Watch MayWeather vs McGregor on Kodi